[5 Methods] How to Remove Background in GIMP?
GIMP is a popular free image editing tool with a lot of features and tools. As a great alternative to Photoshop, it provides users with a wide range of tools for removing backgrounds, whether it's a simple and quick method to remove or a fine tool with attention to details. This guide will detail five effective ways to remove backgrounds in GIMP, as well as other free background removers.
👉️ You May Also Like: [Ultimate Guide] How To Make Background Transparent in 2025?
1. How to Remove Background in GIMP: 5 Methods
Quick Summary:
- Quickly remove simple backgrounds for speed and efficiency: Fuzzy Select and Select by Color
- Need high-precision results, have a certain technical foundation, and are not afraid of time-consuming: Paths Tool and Layer Masks
- Quickly remove photos with a complex background: Foreground Select Tool
1.1 Fuzzy Select
- Best For: Images with a single color or small color change, such as images with a solid or gradient background; Images with a sharp contrast between the foreground object and the background color.
- Pros: Easily remove background in GIMP with simple steps; Quickly remove large areas of the same color background; suitable for novices.
- Cons: The accuracy is low, making it easy to remove foreground elements that are similar in color to the background.
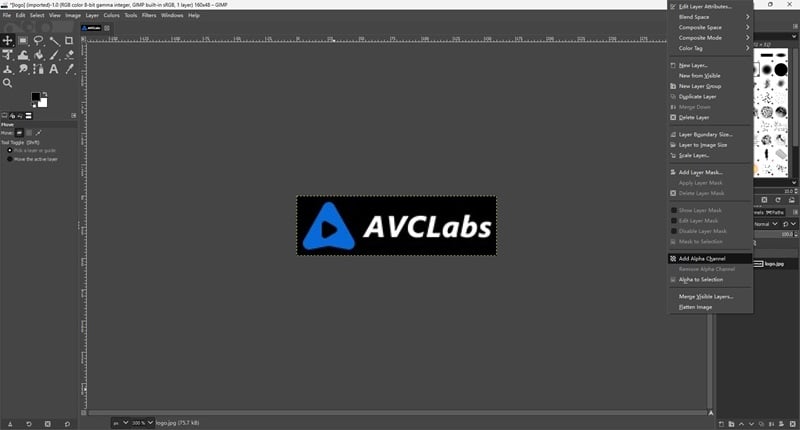
Step 1 Add Alpha Channel
Open the image, right-click the image in the lower right action area and select "Add Alpha Channel" to finally generate a transparent background image.
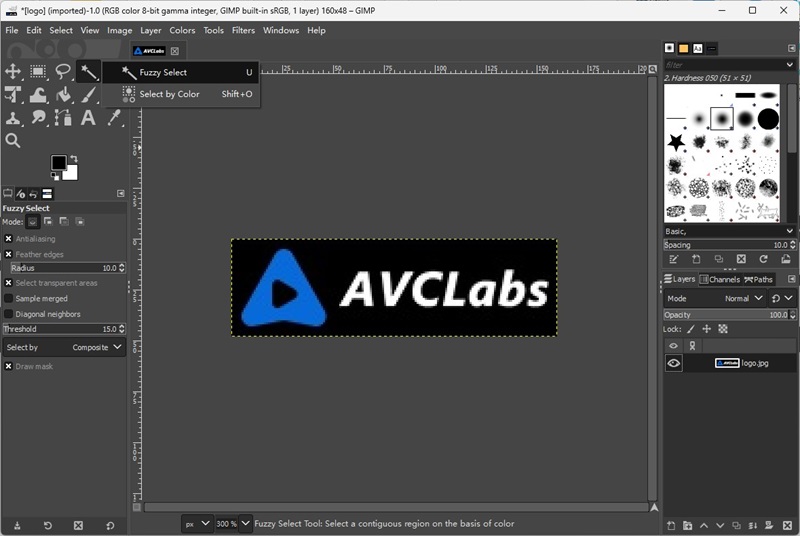
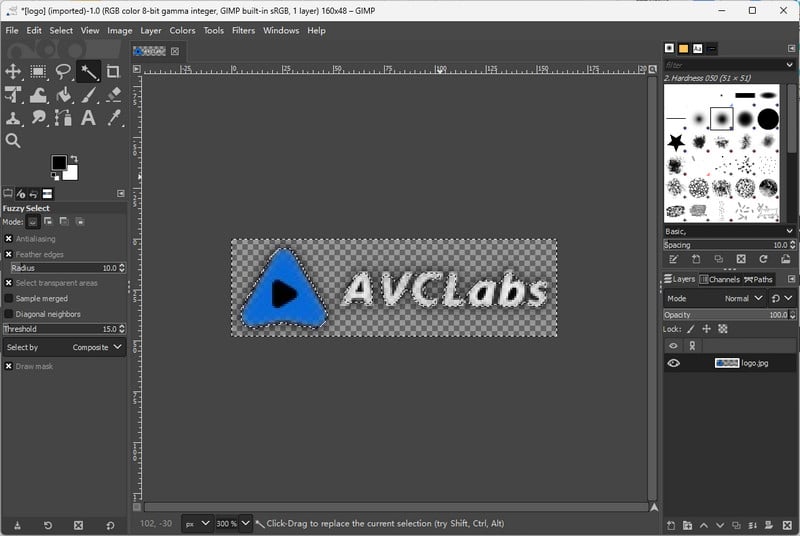
Step 2 Choose Fuzzy Select
Right click on the "Fuzzy Select Tool" and select the Fuzzy Select option. Enable Antialiasing, Feather edges and Draw mask options as needed to significantly improve the quality and precision of transparent image subjects.
Step 3 GIMP Remove Background
Click on the background part of the image and adjust the appropriate threshold to determine the scope and accuracy of the subject.
Press the "Delete" key and GIMP will remove background, creating a transparent image.
1.2 Select by Color
- Best For: Images with a solid background or a highly uniform color area.
- Pros: Process all the same color areas at once; Easy to use, suitable for beginners
- Cons: Weak processing of details, which may lead to loss of details; Unable to process complex backgrounds, such as gradient images.
Step 1 Open an Image File
Open the image you want to remove background from in GIMP and add alpha channel.
Step 2 Use the Select by Color Tool
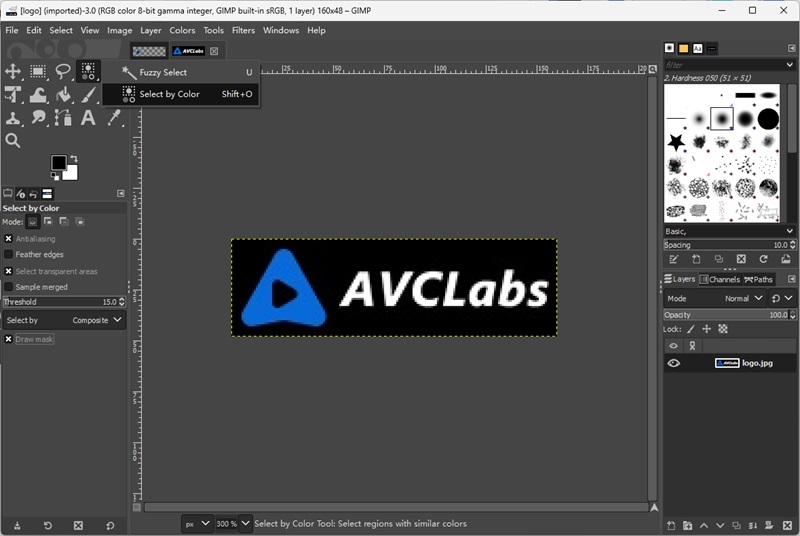
Find the Select by Color tool in the toolbar under Fuzzy Select Tool.
Step 3 Improve Background Removal Accuracy
It is recommended to enable Antialiasing and Draw mask functions. If you want a natural transition area, you can turn on the Feather edges option.
Step 4 Background Removal Using GIMP
Click on the main color of the background and adjust the threshold. GIMP will select all areas with similar color. The smaller the threshold, the more precise the selection.
Click the Delete key to remove background in GIMP. You can repeat the operation multiple times to get a more accurate transparent image.
1.3 Paths
- Best For: Images with clear boundaries and regular shapes; Images that require precise control of the selection area; Images that need to retain details.
- Pros: High accuracy and natural edge transition effect; Flexible adjustment path.
- Cons: Take a lot of time to manually draw paths; Require some learning curve.
Step 1 Add Image
Open the image you want to remove background from and add alpha channel in GIMP.
Step 2 Use the Paths Tool
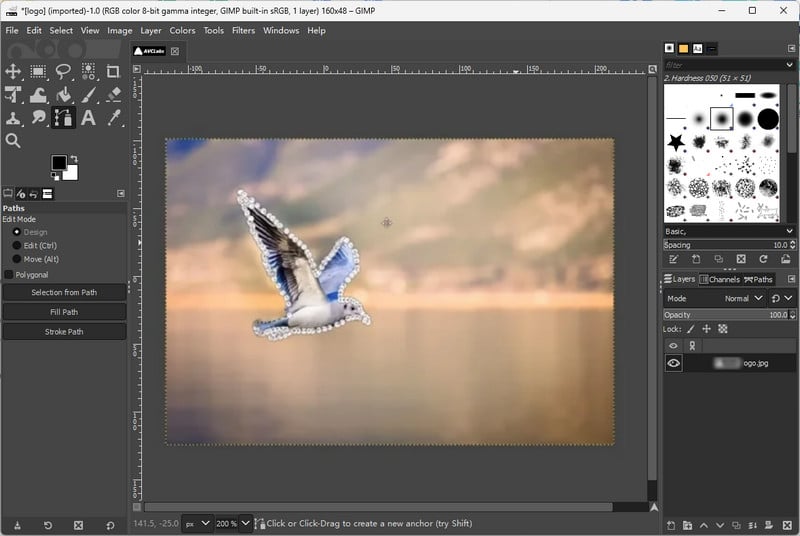
Select "Paths Tool" from the toolbar. Create and draw the part of the subject you want to keep. Connect the last point to the first point to close the path.
Step 3 Outline the Subject
Press the Enter key, or click "Selection from Path" in the lower left corner or select "From Path" under the "Select" menu bar to complete the drawing of the main object.
Step 4 GIMP Remove Background
Go to Select and select Invert to change the subject to the background. Finally, hit the Delete button to remove background in GIMP.
1.4 Foreground Select
- Best For: Images with obvious color difference between foreground objects and background; Images that quickly remove backgrounds and do not require perfect edges.
- Pros: Intelligent identification of foreground objects; Less manual operation; Quickly get photos with transparent background with high accuracy.
- Cons: Handling objects with complex edges may not be precise enough; multiple adjustments are required to get a more accurate photo.
Step 1 Select Background Removal Tool in GIMP
Open your photo in GIMP, add alpha channel, and select the Foreground Select Tool from the Tools Menu.
Step 2 Draw the Object
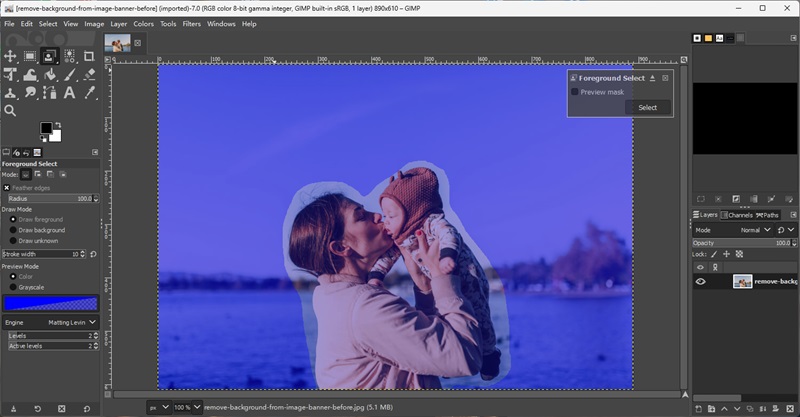
Draw a rough path around the main part you want to keep and press Enter key. The subject in the foreground will appear in light blue.
Adjust the brush size, also known as stroke width, to paint over the main subject. You can scale the image appropriately for precise detail adjustments.
Step 3 GIMP Remove Background
Check the preview mask in the upper right corner and click the select button to preview the remaining subject.
Click "Invert" under the Select menu bar and press the Delete key to remove background in GIMP.
1.5 Layer Masks
- Best For: Images that need to retain details; Images with complex backgrounds that need fine adjustment; Images that need to keep the original image and do not want to modify the image content directly.
- Pros: Non-destructive editing, does not modify the original image content; High flexibility; Preserves intricate details.
- Cons: Complicated operation process, not suitable for beginners; Manual background removal is time-consuming.
Step 1 Duplicate Layer
Open the image you want to work on in GIMP. Right-click on your image in the lower right corner of the action area and select "Duplicate Layer" or click on the Duplicate icon below to create a duplicate of the layer.
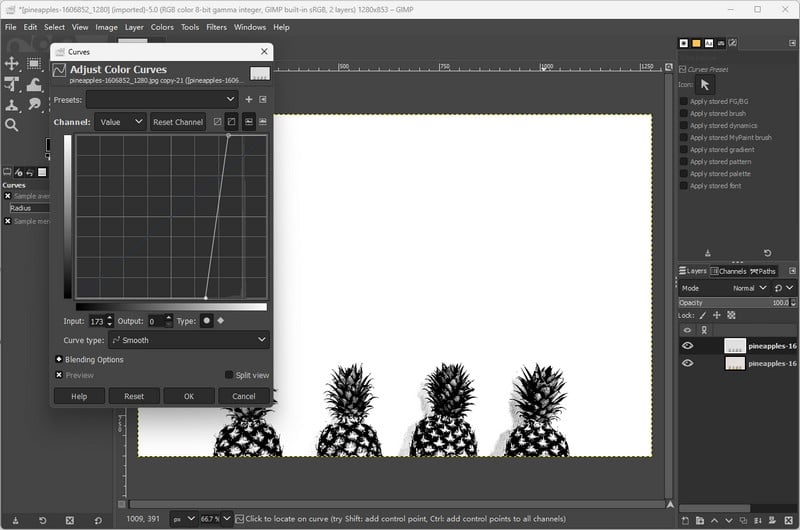
Step 2 Adjust Color Saturation and Curves
Under the Colors menu, click the "Saturation" option and drag the "Scale" to 0 to convert the image to black and white mode, making it easier to distinguish between the subject and the background.
Then select "Curves" under Colors. Manually adjust the top and bottom nodes to increase the contrast of the image and distinguish the colors of the subject from the background.
Step 3 Invert Colors
Go to "Colors" and select "Invert" option to Invert the black and white areas so that the subject becomes white and the background becomes black.
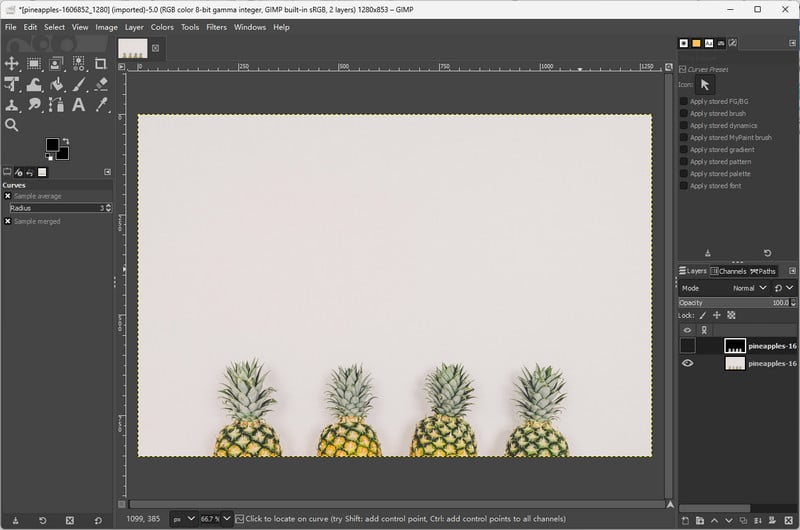
Step 4 Hide Duplicated Layer
Select "Copy Visible" in the "Edit" drop-down menu bar. Hide the duplicated layer by clicking the eye button next to it to provide a clear view for subsequent background removal.
Step 5 Add Layer Mask
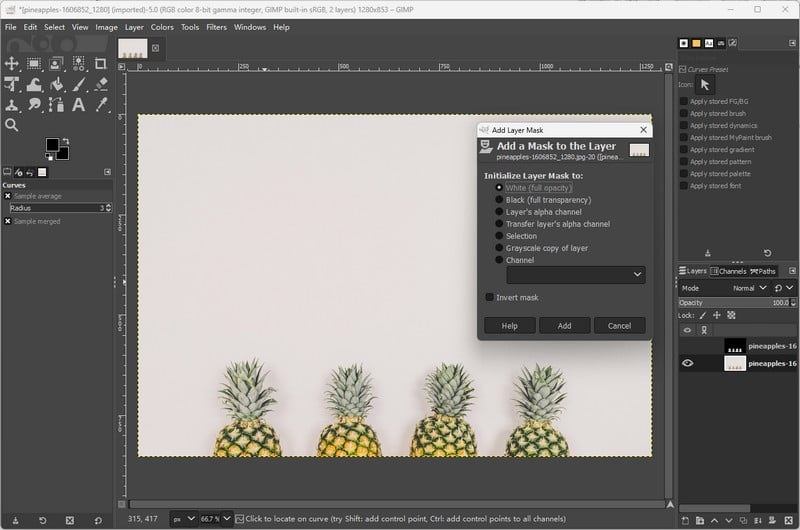
Right click on the original layer and select "Add Layer Mask". leave the default option "Initialize layer mask to white" unchanged and click on the "Add" button.
Then select "Curves" under Colors. Manually adjust the top and bottom nodes to increase the contrast of the image and distinguish the colors of the subject from background.
Step 6 Apply the Black and White Image to the Layer Mask
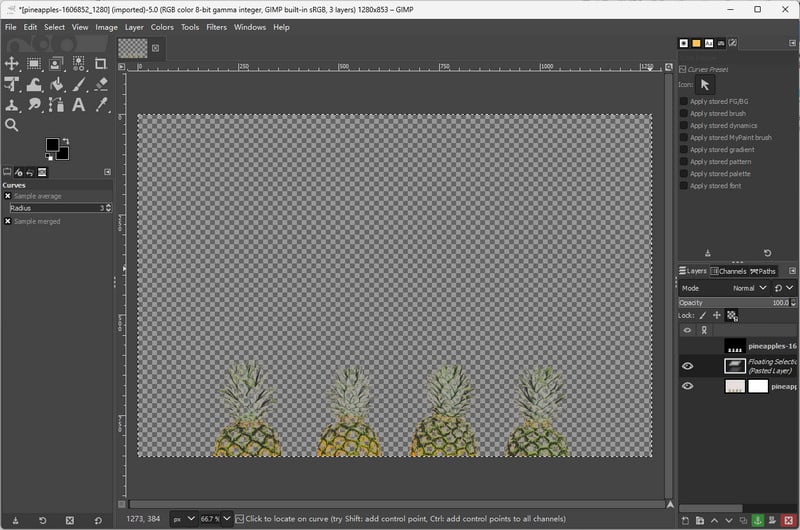
Click "Paste" under the "Edit" menu bar to copy and paste the black and white image into the mask of the original layer. Now, you will see that the background has become transparent.
Click the anchor icon below or right-click the selected image and select "Anchor Layer" to bind the floating selection to the layer mask.
Step 7 Remove Background in GIMP
With the PaintBrush Tool, fix the details of the subject with a white brush and hide the background excess with a black brush.
Finally, save the transparent image with background removed in PNG format.
2. How to Remove Background Online Free?
In addition to using free software like GIMP to remove background, you can also use free tools like AVCLabs Online Background Remover to easily and efficiently get high-quality images with transparent backgrounds. It can remove background free by automatically detecting the subject in any photo and making background transparent within seconds, saving your time and effort.
Step 1 Upload Image
Visit AVCLabs Online Background Remover tool and upload your photos.
Step 2 Choose Background Removal Feature
Click the Background Removal function and sign up to get free credits for free background removal.

Step 3 Free Remove Background
Click the "Remove" button in the lower right corner to remove background. Select JPG or PNG format to save the transparent background image.

3. More Quick and Secure Solution: Remove Background with AVCLabs PhotoPro AI
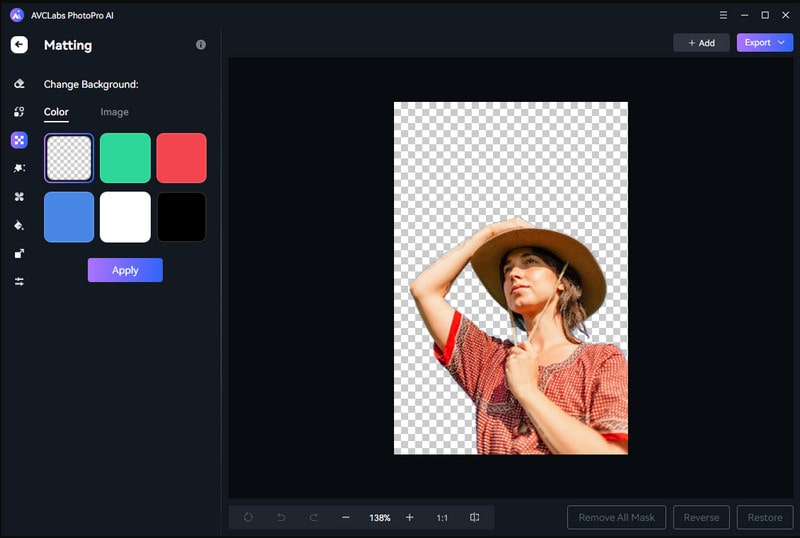
If you don't want to invest time and energy in learning the complicated steps of background removal, but want a quick and efficient way to remove background, AVCLabs PhotoPro AI is the best solution.
The biggest benefits of using AVCLabs PhotoPro AI are efficiency, high precision, and ease of use. AVCLabs PhotoPro AI can intelligently identify the subject and background in the image utilizing powerful AI algorithms. It allows you to quickly remove background in photos with one click and generate high-quality transparent photos.
Key Features of AVCLabs PhotoPro AI
- Remove background and unwanted objects from any image
- Replace object and background for image with text promopt
- Smartly extract and cut out any object from image
- Restore and recover face details on portrait photos
- Colorize black and white photos, calibrate and adjust colors
Step 1: Import Your Photo
Download AVCLabs PhotoPro AI and open your photo file.

Step 2: Choose Background Remover
Select the "Matting" function in the left toolbar and choose the appropriate tool to select the main part of the picture, such as the Foreground selection tool or Object selection tool.

Step 3: AI Remove Background
Click on the "Next" button to generate a transparent background image, and then click on the "Export" button in the upper right corner to save the high-resolution image.
FAQ About Background Removal in GIMP
How to make a transparent image using GIMP?
There are many ways to create transparent images in GIMP: Fuzzy Select, Select by Color, Paths, Foreground Select, and Layer Masks. These tools can be flexibly selected according to different photos to help users effectively make a transparent background in photos.
Why can't I remove the white background in GIMP?
If you can't remove the white background in GIMP, you can troubleshoot according to the following solutions.
1. Add Alpha Channel: If the image does not have an Alpha channel added, removing background in GIMP will not make it transparent.
2. Process the correct layer: If your image has more than one layer, you may be processing the wrong layer or a layer with no transparency.
3. Save the image in a format that supports transparency: If the image is saved in a format that does not support transparency (e.g. JPEG), the background may appear white.
Conclusion
GIMP offers five different background removal tools, namely Fuzzy Select, Select by Color, Paths, Foreground Select, and Layer Masks. If you're looking for a simpler solution, AVCLabs Online Background Remover and AVCLabs PhotoPro AI can provide you with efficient and quick help to easily remove the background.


