How to Make A Photo Clearer Online for Free with AI Before You Share It
Do you know how to make a photo clearer online for free before you share it? If not, now is the time to learn. In this digital age, the way we capture and present photos is changing. Artificial intelligence (AI) technology has led to innovations in photo editing tools that were not possible just a few years ago. Now, before you share photos on the internet, you can use AI-driven online photo editing tools to make your pictures look their best without spending hours tweaking each shot. These AI-powered tools are designed to make your images pop with better lighting, sharper focus, and more vibrant colors. They use computer vision algorithms to detect problem areas in your photos and suggest fixes based on machine learning training sets of images. And because these programs work online, you don’t have to download anything or store gigabytes of image files on your device.
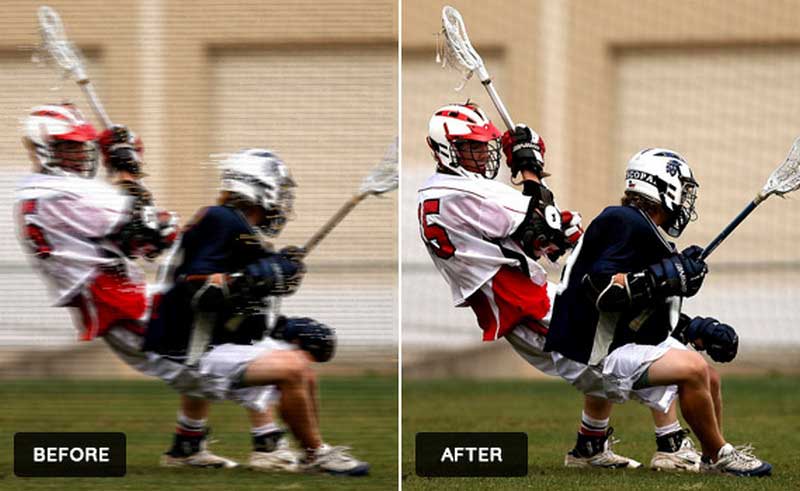
Part 1: What Is AI Photo Editing?
You might also hear the term “machine learning.” They both refer to the same concept: algorithms that are “trained” to make specific decisions based on data. In the case of AI photo editing, those algorithms analyze your picture and make adjustments based on algorithms that have been trained to recognize common flaws in images. If you’ve ever used photo editing software, you know that it’s a time-consuming process. You have to open each image, analyze it, and make the necessary adjustments. AI photo editing makes this process much quicker. AI photo editing often works as a plug-in for your existing photo-editing tool. Instead of painstakingly applying adjustments to each image, you simply click a button to flawlessly enhance your photos.
Part 2: How Does Artificial Intelligence Photo Editing Work?
Artificial intelligence photo editing doesn’t actually change your photos. It simply adds a filter that makes them look like they were edited by a professional. To do this, AI-driven photo editors use computer vision algorithms to detect problem areas in your photo. They then suggest edits based on training sets of images where the same issues were fixed.
If you're looking for a way to make your photos clearer, you should try using AVCLabs AI Image Upscaler. This tool uses artificial intelligence to improve the quality of your photos, and it's really easy to use. Just upload your photo and let AVCLabs do its job. In just a few seconds, you'll have a clearer, more vibrant photo that looks great on any screen.
Steps to make a photo clearer with AVCLabs AI Image Upscaler:
Visit the AVCLabs Online Image Upscaler website and upload a blurry photo.
Click here to visit AVCLabs Online Image Upscaler site and upload a blurry image.

Choose an AI model.
It will automatically jump to the dashboard. AVCLabs AI Image Upscaler supports 7 models for photo editing - Upscale, Face Retouch, Denoise, RemoveBG, Colorize, Calibrate, and Remove Objects. You can choose Upscale model.
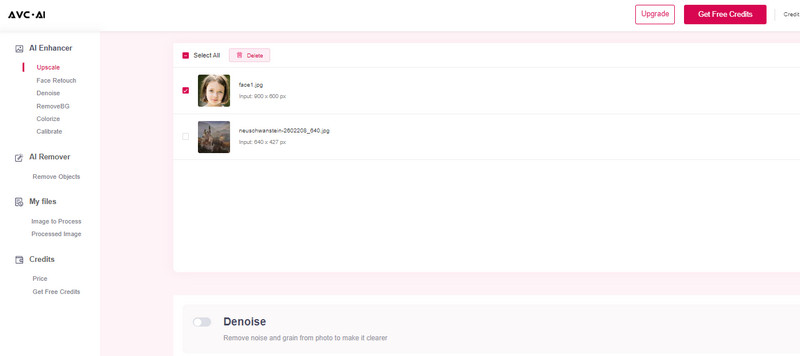
Note: Different AI feature requires different credits. Before you begin the processing, you can click on the "Start Processing" button. It will prompt you on how much credits will cost. "Processing 1 image costs 1 credit. Upscaling 1 image up to 300% costs 3 credits, and 400% costs 4 credits. Using Face Refinement costs 2 credits." Count your credits carefully.
Upscale the photo.
Click the Start Processing button and click Yes to continue.
Preview the effect.
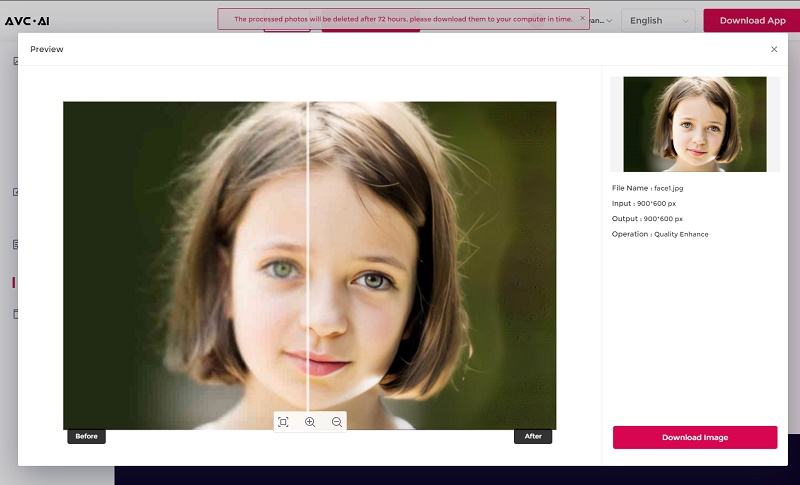
When the process finishes, a red hint will appear on the tab Processed Image. Switch to this tab and you can click the eye icon in the right place to preview the processed photo.
Download the clearer photo.
If you are satisfied with the effect, you can click the download button to save the photo to your computer for free immediately. Please remember to download the processed photo in time since it will be deleted after 72 hours.
If you have a photo that's not as clear as you'd like, AVCLabs AI Image Upscaler can help. With just a few clicks, you can use AI to improve the clarity of your image. Simply upload your photo and let the AI do its job. In no time, you'll have a clearer, more vibrant image that you can share with the world.
Part 3: Other AI-Driven Photo Editing Tools
Artificial intelligence photo editing is a booming industry. There are plenty of popular photo editing apps that use AI to enhance your images. Here are a few of the top AI photo editors on the market.
AVC.AI - AVC.AI is a comprehensive video editing platform with cutting-edge AI models and user-friendly interface. Simply upload an image, and AI will take care of the rest. Ideal for increasing image resolution, restoring blurry faces, removing unwanted objects in your images and more.
Adobe Photoshop Express - This app integrates AI-driven enhancement tools into a streamlined interface. It’s a great choice for beginners who want to experiment with AI-driven photo editing technology.
Autodesk Pixlr - Pixlr is easy to use, and works across all devices. You can quickly edit your photos using AI technology from your phone or desktop computer.
Microsoft To-Do - This AI-powered photo editor is part of Microsoft To-Do, a task-management app built for the modern workplace. It’s a great option if you’re already using To-Do to organize your daily activities.
Google Photos - This is one of the most powerful AI photo editors on the market. Google has been perfecting image recognition through machine learning for years. It’s a great choice if you want to completely automate your photo editing process.
Snapseed - Snapseed is a powerful photo editor with a sleek interface. It’s a good option if you want a user-friendly app with robust AI-driven editing technology.
Part 4: Pros and Cons of Using AI for Photo Editing
Pros of using AI for photo editing:
You spend less time editing - If you hate editing your photos, AI can help. By using an AI-driven photo editor, you can quickly enhance your images without having to spend hours clicking buttons.
Your photos look better - AI-driven photo editors make your images pop with better lighting, sharper focus, and more vibrant colors.
Your photos are consistent - Editing your photos using AI ensures that they all look the same. No matter which photo you edit first, the AI editor will remember your settings, and apply them to all future images.
You can apply consistent edits to group photos - It’s a pain to apply the same edits to dozens of photos. Using AI, you can select a group of images, and then apply one preset to make them all look consistent.
You can create beautiful photos with creative effects - AI-driven photo editors let you create artsy photos with creative effects like split toning and selective coloring.
Cons of using AI for photo editing:
You lose some creative control - When you use an AI-driven photo editor, you’re letting a computer make creative decisions. This means that you won’t have full control over what edits are applied to your photos, and you can’t really be creative with your images.
You lose flexibility - Because every photo editor has its own set of editing tools, you’ll have a much harder time applying consistent edits across a group of photos if you’re using multiple tools.
You can’t use your photo editor’s other features - AI-driven photo editors only offer the basic editing features of your photo editor. This means that you can’t use the other features in your editing program, and are missing out on potentially helpful tools.
AVCLabs Photo Enhancer AI software
If you are not satisfied with online photo enhancing, you can try a free photo enhancing software to make your photo clearer. AVCLabs Photo Enhancer AI is the best choice for you.
AVCLabs Photo Enhancer AI is a photo upscaling software applying AI technology. It uses a perfect combination of AI technology and machine learning algorithm to create a perfectly upscaled photo and offers fast, speedy, and high-quality results, and does not require any skills.
Photo Enhancer AI
Automatically enhance photo color, contrast, and quality
Make the old, blurred, or low-quality photos to high-definition and clarity
Colorize black and white photos; Remove noise and calibrate colors in one click
Enlarge/up-scale the photo size without losing quality
Steps of AI to make a photo clearer:
Download and install.
Download and install AVCLabs Photo Enhancer AI on your computer. Before downloading, you can click here to know detailed information about the system and hardware requirements of AVCLabs Photo Enhancer AI.
Import a not clear photo.
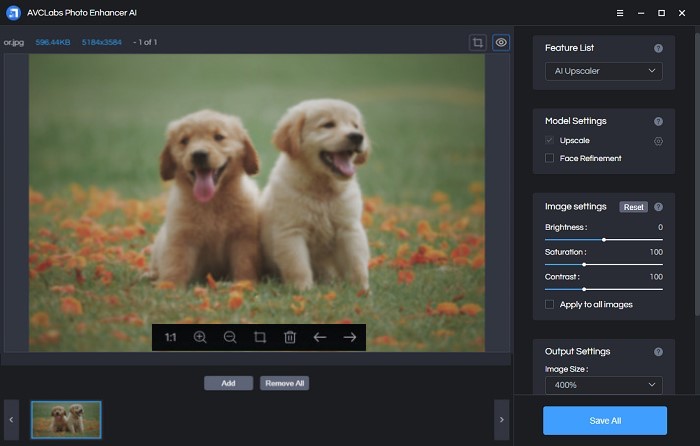
After you install the program on your computer, you can launch and you will see the main interface as the picture shown below.

Then just click on Browse and choose the image files to import in batch. You can also drag and drop the source file to the program.
Set the AI Model.
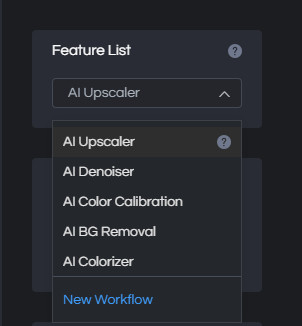
In the right panel, you will see AI Model in the right panel. AVCLabs Photo Enhancer AI offers 5 options of AI Model: Upscale, Denoise, BG Removal, Colorize, and Color Calibration. To improve the resolution of the photo, here we need to choose AI Upscale model.
For the Scale, here are 100%, 200%, 300%, and 400% for you to choose. If you want to convert the low-resolution to extreme high, then you can choose the largest one 400%.

Start the process.
Click on Save All and the program will start to improve the image resolution automatically. When the process completes, you can click on Open Output Directory to open the default output folder to check the image. You can also tap on the Menu button > Settings > Change to choose a folder and then click on Apply to change the output path.
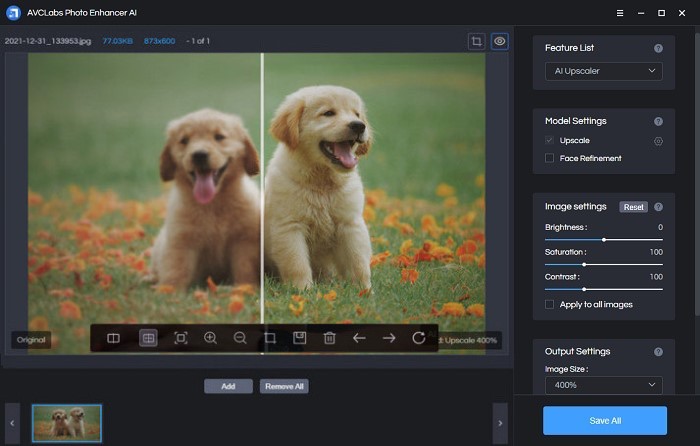
AVCLabs Photo Enhancer AI can take your photos to the next level, giving them a professional look that will impress everyone who sees them after you share them on the internet.
Part 5: Tips to Adjust Your Photos
Almost everyone uploads their pictures on social media sites at some point or another. The photos we post on these sites can either make us look like a credible individual, or they can make us look foolish and unprofessional. How your photographs come across is up to you. You have the power to make them appear clear and crisp before sharing them with other people. If your photo has lots of visual noise or distractions, the first thing that you should do is increase the contrast so that there aren’t any muddy areas of darkness or lightness in your picture. Once that’s done, go ahead and follow these steps on how to make a photo clearer online for free before you share it.
Step 1: Adjust the Exposure
If your photo is too dark or light, adjusting the exposure will make it look much clearer. If you have a photo that is too dark, simply make the exposure brighter until you get the desired result. If you have a photo that is too light, simply make the exposure darker until it has the desired appearance. This step is particularly important if you’re taking a photograph indoors. The light bulbs in the house might be too bright to take a clear photograph. In this case, you can use a darkening filter to reduce the intensity of the light. However, if you’re taking a photograph outdoors, you may have the opposite problem. The sun might be too bright, which makes it difficult to take a clear photograph. In this case, you can use a lightening filter to reduce the intensity of the light.
Step 2: Adjust the White Balance
The white balance usually is set to whatever light source is around you when you take the photograph. If the light source is artificial, then the white balance is set accordingly. However, if you’re photographing something in front of a window, the light source may be coming in from the sun. In this case, you have to set the white balance according to the sunlight, not the artificial light indoors. This will help make your photo clearer.
Step 3: Sharpen the Image
A photo that isn’t sharp won’t look clear to someone who is looking at it. This is because the viewer won’t be able to see details in the photograph and will get confused about what’s in the picture. You can sharpen the image by going to the ‘edit’ tab on your computer’s program or app and then selecting ‘sharpen’. If you want to do this on an image-editing app, you can select ‘filter’. Then, select ‘Sharpen’. Another way to sharpen the image is to simply zoom in on it as much as you can. Make sure that you zoom in on the image up until you can see the pixels.
Step 4: Adjust the Color Tint
You probably already know that you can add a tint to a photograph in a photo-editing app. Well, you also can remove the tint from an image. This means that if your image has a tint with a particular color, you can simply remove it. If you have a photo that is too red, you can simply decrease the red color, and the picture will look much clearer. If you have a photo that is too blue, you can simply increase the blue color, and the picture will look much clearer. You can also adjust the intensity of the other colors in the image. This will make the picture even clearer and more visually appealing.
Conclusion
Artificial intelligence has changed the way editing photos. You can use AVCLabs AI Image Upscaler to quickly enhance your images with better lighting, sharper focus, and more vibrant colors. This photo editor are designed to make your pictures look their best without spending hours tweaking each shot. It use computer vision algorithms to detect problem areas in your photos and suggest edits based on machine learning training sets of images. Now, you can spend less time editing, and more time enjoying the photos you take.


